


These may be caused by unrecoverable software or hardware problems which may shutdown your computer or reboot by itself displaying a message stating that "Windows has been shut down to prevent damage to your computer." You may get network error prompts like "The dependency service or group failed to start" or other problems may occur like not being able to play audio. There are a lot of factors that may cause these, however, there are ways to get the system fixed. If it's too hassling for you to reinstall the Operating System, you may want to try other troubleshooting steps, otherwise, take Operating System Reinstallation (OSRI) as the last resort. There are various complex ways to fix OS issues, but the following steps are usually applicable for common OS issues:
System restore
System Restore is a Windows feature which restores your computer's system files, registry, and programs to a previous state before a problem or system failure might have started. It's a way of rolling back system changes to your computer without affecting any personal file such as e-mail, documents, or photos. To restore your computer to a previous restore point, follow these steps:
1. Click on Start, go to All Programs > Accessories > System tools > System restore to open the System Restore dialog window.

2. Select Choose a different restore point, then click Next.

3. Select the Date and Time to when you want your system to restore to, most preferrably to the previous state when your system had been working fine. You may put a check mark in the Show more restore points checkbox. Click Next.

4. Click Finish to confirm your restore point. Wait for System restore to reboot your computer.

===================================================================================
sfc /scannow
1. Click Start, go to and click Accessories, then click System tools. Right-click Command Prompt, then click Run as administrator. The Administrator Command Prompt window will open.

2. On the blinking cursor beside C:\Windows\system32>, type sfc /scannow, then press Enter. Wait until system scan is complete. System errors may be detected and fixed by sfc /scannow.

===================================================================================
Startup Repair
Startup Repair is a little more complex than sfc /scannow. It is a Windows recovery tool that can fix bigger problems like missing or damaged system files and registry, preventing Windows from starting correctly. Startup Repair scans your computer for problems and then tries to fix it so that your computer can start correctly. Startup Repair may run automatically if preinstalled in the system, if not, it may run manually using a Recovery disc. To run Startup Repair manually, follow these steps:
1. Insert the installation disc.
2. Click Start orb button, click the arrow next to the Lock button, and then click Restart.

3. If prompted, press any key to start Windows from the installation disc.
Note: If your computer is not configured to start from a CD or DVD, check the information that came with your computer. You may need to change your computer's BIOS settings. Accessing the BIOS may vary depending on the BIOS manufacturer. Usually, you must press a key (such as F2, F12, DEL, ESC) or a key combination immediately after you turn on your computer but before Windows starts. For more info, check the tech sheet or manual which came with your computer or go to the computer manufacturer's website.
Be careful when changing BIOS settings. The BIOS interface is designed for advanced users, and it's possible to change a setting that could prevent your computer from starting correctly.
4. Choose your language settings, and then click Next.
5. Click Repair your computer.
6. Select the operating system you want to repair, and then click Next.
7. On the System Recovery Options menu, click Startup Repair. Startup Repair might prompt you to make choices as it tries to fix the problem, and if necessary, it might restart your computer as it makes repairs.

If Startup Repair is a preinstalled recovery option on your computer:
1. Remove all floppy disks, CDs, and DVDs from your computer.
2. Click the Start orb button, click the arrow next to the Lock button, and then click Restart.
3. Do one of the following:
If your computer has a single operating system installed, press and hold the F8 key as your computer restarts. You need to press F8 before the Windows logo appears. If the Windows logo appears, you will need to try again by waiting until the Windows logon prompt appears, and then shutting down and restarting your computer.
If your computer has dual boot or more than one operating system, use the arrow keys to highlight the operating system you want to repair, and then press and hold F8.
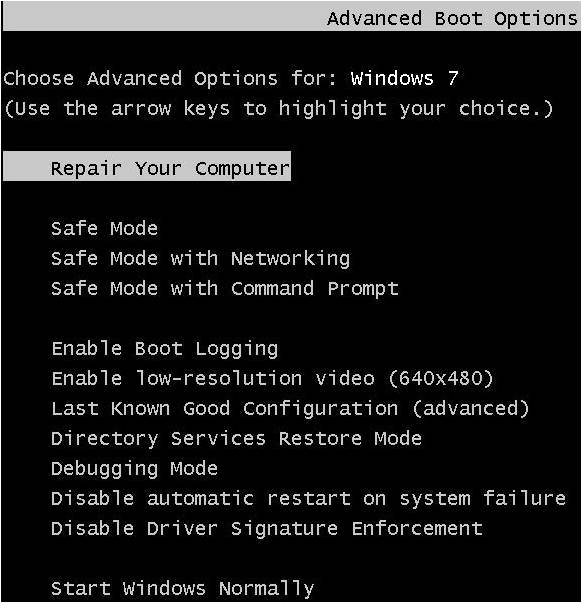
4. On the Advanced Boot Options screen, use the arrow keys to highlight Repair your computer, and then press ENTER. (If Repair your computer is not listed as an option, then your computer does not include Startup Repair as a preinstalled recovery option.)
5. Select a keyboard layout, and then click Next.
6. Select a user name and enter the password, and then click OK.
7. On the System Recovery Options menu, click Startup Repair. Startup Repair might prompt you to make choices as it tries to fix the problem and, if necessary, it might restart your computer as it makes repairs.
===================================================================================
Operating System Reinstallation (OSRI)
As the last resort, if you do not have a Recovery disc, you can install a new, clean version of Windows by using the Windows installation disc. However, you must reinstall all of your other software separately in this case.
For more information about how to reinstall Windows from the Windows installation disc, click the picture below.


0 comments:
Post a Comment